Pin It

Follow Me on Pinterest

About Me

Burnsville, Minnesota
Scrapbooker, card maker, cricut expert, Tim Holtz stalker and Zentangle Addict!

Tuesday, December 4, 2012

December Daily A Smashing good idea


     So I have been missing sharing with all of you for the last few weeks.  With Thanksgiving being here and trying to get everything done for Christmas It has been crazy busy.  I have been wanting to share something with you all that I am doing this year for christmas and meaning to get it done sooner and havent.  Due to my latest obsession with my smash journal, I have come across the December Daily book thanks to my fellow friends over at SmashAholics Anonymous on FB.  It was created by the very talented and creative Ali Edwards and it basically is making a smash book of its own for the 25 days of christmas.  Some of us do it for all of December and some of us do it for Thanksgiving into the end of december.  Basically you can do it however you like.  I am making mine to record all the things about christmas that I love.  Some examples are the tree, decorations in and out, lights and shopping around town, visiting santa, the presents, christmas eve, santa cookies, the letter, the meal and the list goes on.  If you follow me on pinterest I have quite a few under my paper arts board for you to look at.  Below you will find a christmas zentangle that I plan on using in my December Daily book and below that will be a video of a flip through of what I have started so far in the book.  The tags I cut, embossed and stitched to the ribbon.  The numbers are velvet and cut with my cricut machine.  I would love to know what you are doing for christmas and to see what you have to share!


the flip through is on my youtube channel blogger unfortunately never loads my videos properly so check the December Daily video out here http://www.youtube.com/watch?v=rDZOSLREaeI
 
 
Happy Holidays
Melissa


Friday, November 9, 2012

A smashing good time

 
 Hi Happy Friday everyone, just popping in to let everyone know what it is I have been up to this week. Besides working and running kids to appointments and so forth I found a little time to play with my smash book that has been so neglected.  I had so much fun and heres why.  I can spend more time on it because it is small and I can take it and a few pics and embellishments along with me to appointments with the kids while I sit in the waiting room.  It's not as overwhelming to fill a whole page.  Its more like the old style of scrapbook where you just glue random things in and keep momentos.  Its a no rules smash it in daily journal of sorts. 


Whether you by smash brand stuff from K & Company or make your own embellishments there is a ton of creativeness waiting for you to uncover in these journals.  If you go to the beach glue some of the sand down.  If your son or daughter had a terrific homerun at thier last baseball game scoop up a tiny bit of the dirt from homeplate and stick it in there or maybe in a llittle sealed bag.  Whatever the journey you can smash it right on the page with a pic to keep it.  Some people even make thier own smash style journals, if you really want to get creative here is a youtube link to show you how http://www.youtube.com/watch?v=U9oV9akW-fo.  If you dont want to make your own here is a video of a ladies journal and what she has it in it.  It is rather long but gives you an idea of the stuff you can put in it and some of the smash brand product as well as how she made some of her own embellishments http://www.youtube.com/watch?v=GYc0HR7Niuk&feature=related .  This should help you get started as well as take you to other videos you can search on from there.

Here are a few of the pages I have worked on.  The first ones are from our favorite hangout the science museum.  My daughter loves the rock and bug collections and my son of course goes for the electrical circuits and connector experiments.  I used October Afternoon's woodland park line.  I just used thier 8x 8 pads and embellishments.  I can carry those in a small bag no cutter needed since its a smash book and imperfections are a plus!  I take with me in the bag the following pop dots, scissors, glue pen, red line tape and all my stickers, wild cards, ribbon and tin pins and so forth are in a plastic box organized by line, pics and of course my glue gun.  Oh yeah and a few pens.Yes this all fits in a reusable shopping bag LOL
The whole page
 
 
close up of stickers and the cricut cut butterfly on the right edge


These photos are from the Science Museum the papers and stickers are from October afternoon.  Mostly I used the Woodland Park line the stickers are from report card line I believe.

 
The second pages are from a premier of the Real Pirates of course at the Science Museum again!  My daughter was given a gold coin by a Jack Sparrow knock off.  He walked past her stopped leaned back and handed it too her and told her to by a new tooth because her front tooth had fallen out. This was a great day for her because she also won tickets to the premier.  Guess that gold coin had a little luck in it also.  The last one is a funny one of our dog Jett who was not happy he wasnt going camping with us.  The pictures speak for themselves.  Enjoy!
 
Woodland Park used here once again.  The tin pin although is from 5& Dime.  See my mistake on the wording on the sticker?  I decided to leave it, yes its killing me but will stay.  I love the title around her head this was a day glo pen from Archivers.
 
Here I used the Campfire line from OA.  The wild card was a different line I have no idea which one.
Ha poor guy!  I felt sooo guilty!


Thats all for now everyone, have a great weekend and take some time for yourselves.
 
Melissa
 

Thursday, November 1, 2012

October Afternoon product for sale

Hi all

I am selling a bunch of my October Afternoon product, I need to make room for the new goodies I bought this past weekend at the sale.  For a easy list you can go to Splitcoaststampers and view my profile mmiissyy  or you can leave me a message at paperinstructor@yahoo.com for more info.  Here is the list for your viewing pleasure LOL.

TFL
Melissa

Here is the list

Seaside Collection
16 sheets of Alpha stickers 2.00 each
4 sheets of swim trunks .70 each
2 sheets of sailboat .70 each
4 sheets of label stickers 2.00 each

Schoolhouse Collection
2 shape stickers 2.00 each
2 sheets flashcards paper .70 each
3 sheets Ruler "sample" paper .25 each
5 sheets of chalkboard paper .70 each


Report Card Collection
4 sheets of Hot Lunch paper .70 each
5 sheets of Bus Route Paper .70 each
5 sheets of Recess Paper .70 each
6 sheets of Science Fair paper .70 each
5 sheets of Field Trip paper .70 each
3 sheets of Story Hour paper .70 each
5 sheets of shape stickers 2.00 each

Daydreams Collection
3 sets of Journal cards 2.00 each
8 sheets of shapes 2.00 each
4 sheets of Garden Chair paper .70 each
4 sheets of Rain boots paper .70 each
Modern Homemaker Collection
5 sheets of It's suppertime- Cmon in paper .70 each

County Fair Collection
4 sets fo Journaling Cards 2.00 each
4 sheets of petting zoo paper .70 each
1 sheet of Ferris Wheel paper .70 each

Good Cheer Collection
6 sets of journal Cards 2.00 each
1 sheet of shapes 2.00 each
2 sheets of sleigh bells paper .70 each
4 sheets of sugar cookies paper .70 each
2 sheets of tinsel paper .70 each

Very Merry Collection
10 sheets of shape stickers 2.00 each
3 word stickers
Cherry Hill Collection
1 alpha sticker 2.00 each
15 sheets of new apron paper .70 each
4 sheets of tea towel papers .70 each
3 sheets of cookie jar papers .70 each
20 sets of journal cards 2.00 each

Rocket Age Collection
13 sheets of Rocket Age stickers 2.00 each
10 sheets of Captains log paper .70 each
12 sheets of deep space probe .70 each
10 sheets of black hole .70 each
10 sheets of Blast Off .70 each
10 sheets of incoming transmission .70 each
12 sheets of Return Voyage .70 each
6 sheets of all systems go .70 each
10 sheets of docking manuever (keypunch type computer paper) .70 each
10 sheets of label stickers 2.00 each

Thrift Shop Collection
2 sheets of Good Junk paper .70 each
3 sheets of last one paper .70 each
5 sheets of still in the box paper .70 each
6 sets of Journal cards 2.00 each

Weathervane Collection
3 sheets of cozy home papers .70 each
5 shets of crunching leaves papers .70 each

Fly A Kite Collection
1 shape stickers 2.00 each
8 sheets of fireflies papers .70 each
8 sheets of Garden papers .70 each
17 sheets of dandelions papers .70 each
4 sheets of word label stickers 2.00 each

5&Dime Collection
15 sheets of alpha stickers 2.00 each
10 sheets of butterscotch papers .70 each
10 sheets of Jawbreakers papers .70 each
10 sheets of wax bottles papers .70 each
8 sheet of rock candy papers .70 each
12 sheets of rootbeer barrels papers .70 each
10 sheets of Circus Peanuts papers .70 each
8 sheets of bubblegum papers .70 each
8 sheets of lemon Drops .70 each
3 sheets of word stickers

Boarding Pass Collection
1 sampler pack of each paper in line 5.00
1 sheet Reseau Auto Bus paper .70
1 sheet London paper .70
4 Chip N sticks 4.00 each

Road Map Collection
4 sets of journal cards 2.00 each
4 sheets of blue&white motel .70 each

Farm Fresh Collection
20 sets of Journal cards 2.00 each
4 root cellar papers .70 each
4 chicken coop papers .70 each

Detours Collection
2 shapes 2.00 each
4 sets of journal cards 2.00 each

Hometown Collection
20 mainstreet papers .70 each
5 sheets of woolworths papers .70 each
3 sheets of KM building papers .70 each
5 sheets of County Library .70 each

Ducks in a Row
2 shapes 2.00 each

Campfire Collection
5 word stickers 2.00 each
4 label stickers 2.00 each

Friday, October 26, 2012

Well it is almost all hallows eve, the pumpkins will be carved the haunted houses dark and scary and soon we will have all the candy we ever needed or wanted.  The streets will be filled with witches and ghosts and things that go bump in the night.  We will take in the fresh autumn air one last time before all the trees become bare and the snow falls all around us.  Halloween is a favorite time of year at our house and I hope you take the evening to enjoy all the festivities whether it is with your children, the neighbors or possibly enjoying your grandchildren.

Tonight I am bringing you a couple of cards that I have made in the last few days.  They are both "cased" cards from the CARDS magazine from Northridge Publishing.  The first is made from a lady by the name of Paige Evans at paigeandchris.com.  I cannot show you her card as my subscription to CARDS magazine is a digital and I cant share the link.  Below is my case of the card.  I cut 1" square pieces of paper from a punch and turned it on point and folded two corners to the middle.  They were then sewed with my singer over the top.  The rest is obvious, the sentiment "YOU ROCK"  is from StampinUp!.  The papers were scraps from October Afternoon.


These are my my daughters Thank You cards for her birthday party.  Next are my Halloween goodies yes never fear there are halloween goodies in this post.  The first is a card I made with svg cut files from Lettering Delights the file is called Best Witches.  I sent this card to a neighbors little girl who was feeling under the weather. 
 
 
Last but not least this next card is also a case from CARDS magazines October issue 2012 made by  Christine Meyer at ScrappingwithChristine.blogspot.com.  Go visit these girls site and send them some love.  My card was made with the new Witch Hazel line from October Afternoon.  My favorite scrapbooking buddy and I hit the sale today and quite enjoyed ourselves!  The layers on the bottom as you can tell from the pictures are diamond shapes and the lower half of the diamonds are left unattached to give dimension and a look of layers.  The word strip is from the Witch Hazel miscellany kit and the black cat from their alpha stickers from the same line.  The buttons are also from the same line the twine is trendy twine that I had laying around.  The music note paper was cut from a svg file I found by googling lace svg and cut from the music note paper from the 8x8 paper pad.  That about sums it up.  Off to the Haunted Hallway I am running tomorrow at the High School, very excited to do some living dead makeup and evil creatures of all kind.  It will be a good time.  Have a great Halloween and until next time be blessed in everything you do.


Saturday, October 6, 2012

The Gate Fold Card


       Okay everyone this is my last post.  I sincerely hope you took some time for yourselves today and enjoyed the tutorials I had for you.  My last one is a easy card not quite as much folding or cutting as the others but still a nice interesting card


Heres the supplies................

  • Scor-Pal or other scoring board
  • 4 1/4" x 8 1/2" piece of cardstock
  • adhesive
  • additional cardstock
  • designer paper
  • embellishments


Heres the instructions.....................................


1.  Score your 4 1/4" x 8 1/2" piece of paper at 2 1/8" .  Without moving the cardstock score again at 6 3/8".

2. Cut patterened paper to adhere to card front panels.

3.  Cut basic white cardstock for inside of card for sentiment.

4.  Last but not least embellish front of card with qoute or flower or other image.

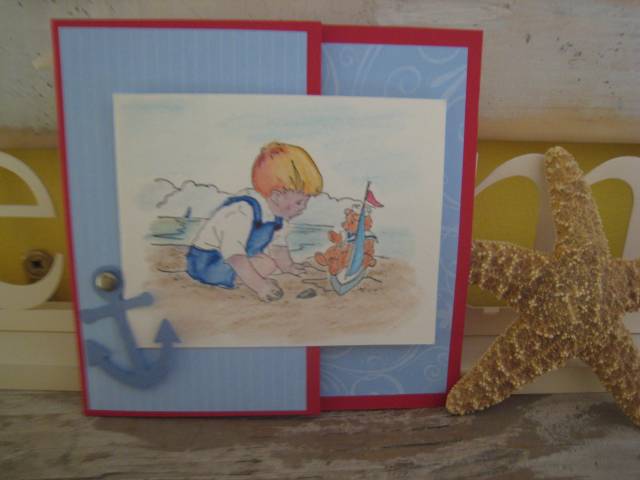
The image below is an old gate fold card I first made when I was new to this thing.  As you can see I added another panel on the front and an anchor.  The
anchor is fastened with a brad and actually serves the purpose of holding the card shut.  When you move the anchor it opens the card.   The card was done with watercolor pencil.


I have five classes next week so if you are interested in joining us for them I still have spots open.  Cricut Test Drive @ 10am on Tuesday, Cricut Card Tricks @ 10am on the 12th,  Vintage Holiday Cards @10 am on the 13th, Cricut off the page @ 10 am on the 16th,  and Flower Wow @ 10 am on the 11th.  I should mention that all these classes except the Cricut test drive class are also offered at 6 pm that day if you cant make the daytime classes.


Have a marvelous week and be blessed,
Melissa


Crimped Envelope Pocket Card World Card Making Day Post #2


The Crimped Envelope Card

    Another card that I have not made in a while but it is a really nice affect with the crimping of the case or holder made from a envelope. 

Here are the supplies you will need:
  • A2 size Envelope
  • Paper Trimmer
  • Crimper
  • Tape runner
  • Stamps, stickers or diecuts 
  • Cardstock for inside of card
The four easy steps.................

   *  First seal the envelope just like you would if you already had the card in there and you were going to mail it. 
 
   * Second cut a 1 1/4" of the short side of the envelope.  Keep the piece you cut off it will become your topper for the card cover.  The rest of the envelope will make a pocket that holds the card and will become crimped with our paper crimper. 
 
   *  Third I ran an ink pad over the sides and edges of mine and stamped it with a canvas background stamp.  Next run the large part of the envelope through your paper crimper making sure the cut edge is off to the side.
 
    * Fourth  you have made the outside or holder for the card now you will cut the insert portion of the card out of your neutral colored cardstock the dimensions for this should be 4" by 4 1/4".  You can get creative here and add layers and so forth to this insert.  
 
     Keep in mind that you can make this card a million different ways with any size envelope.  It could be a gift card holder, you could make a vintage style one with a manilla envelope or you could make a clear vellum one and put confetti in it.  I could go on and on here the possibilites are endless.


Happy card making,
Melissa 
 

Criss Cross Card

    
     Well have you made any cards yet?  Me neither I better get on it huh.  Actually my post I am typing up on friday night because I have Robotics meetings all morning and afternoon tomorrow.  I am helping the students organize a Haunted Hallway event as a fundraiser this year to make money for the Robotics team, just incase we go to nationals or something.  I will be sure to keep you updated on all the fun artsy stuff we do.  We are making bake goods, decorating, mechanics, costumes, sound effects and lots of chemistry tricks.  I will however get to play tomorrow night as the hubby is going to a friends house for an Octoberfest.  I will be staying home with the girl.  So on to another fun card

     This is the Criss Cross Card and here is what you will need.........


  • Two 4 1/4" x 11" pieces of cardstock for your card base
  • One 4" x 5" piece of patterned paper
  • One 3 3/4" x 5 1/4" piece of cardstock for insert
  • One 3 1/2" x 4 3/4" piece of neutral cardstock for insert
  • One 1 1/2" x 12" piece of colored cardstock for card band
  • Ink if you are using stamps
  • Stamps ,stickers or diecuts
  • Adhesive
  • More paper for accents
  • Corner rounder or you can round with scissors


  • Putting it all together......


          1.  Score both 4 1/4" x 11" pieces of cardstock at 5 1/2".
     
           2. Take one scored piece and cut it diagonally from center top to the bottom left.
               Take the other piece of scored cardstock and cut it diagonally from the center top to
               the bottom right.
     
          3.    Add adhesive to the rectangle back of one of the cardstock pieces.  Adhere it to     
                 the other rectangle back of the other piece.  Making sure both long edges of the
                 diagonals are on the bottom of the card after the two pieces are glued together. 
     
            4.  Cut your patterened paper in half on the diagonal and cover the diagonals on the
                  cardstock base with them.  You can use two different coordinating patterns here or
                  they can be the  same pattern its up to you.
     
            5.  Add sticky strip on the bottom of the middle panel, as well as on the bottom
                 of the triangle flap that will be on top of the card and going up the side of the triangle
                 from  the  bottom about 2".  I usually put the left side over the right side.

             6.  Next use a corner rounder on the top two corners of both of your cardstock pieces

                   for the insert.  If you dont have a corner rounder you can use scissors and eyeball a
                   round corner. Tape two pieces together.

              7.  Stamp image or sentiment on insert or use stickers or rub ons or something to that
                   effect. Top off with a ribbon attached to the top of the insert for a pull tab or you can
                   make a paper tab and attach that.
     
            8.   Take the 1 1/2" x 12" piece of colored cardstock and score at 5 5/8" and 11 1/4".
     
            9.     Add Sticky Strip™ to the end of the strip with the small 3/4" scored section. Tape
                    band  together.  Decorate band with die cuts, flowers jewels or other embellies.
                     Slide your band over your card. Your card is finished!

     
      This one has a few more steps but its not hard give it a try it will be worth it!!!!!!  Hope I am inspiring you out there.


    Melissa


    Make Your Own Cricut Cutting Mats


         Yes that title is read correctly, and yes I am sharing a little secret with you that I just found out over at the 2011 get organized challenge facebook group.  The Dollar Tree Dollar store has these veggie chopping mats that they sell that are the exact thickness of a cricut mat and the same size!  I use Krylon Easy-Tack Repositionable Spray #7020 when making my current mats resticky.  I almost always use mine until they crack in half and then I repurpose them for putting under projects that are messy.  Yes call me cheap but this is an expensive hobby and I like to think it allows me to buy the next have to have product on the market (Wink,Wink).

         Heres a picture of what you are looking for.........


    and here is what the spray looks like.........


    Tape off the edges with blue painters tape spray on the adhesive and let set.  I then took the packaging the mats came in to use for "covers" for the mats.  You could also use your old cricut mat covers if you have them.


    So there you go hows this for a happy World Card Making Day gift.

    Back Soon,
    Melissa

    Happy World Card Making Day Post #1


    Waterfall Card Tutorial

         I hope you all are taking some time to enjoy this day and learn some new card folding techniques!  My first tutorial for you that I have today is the waterfall card this is a favorite fold for me and one that I go to when I need that extra special card for a birthday or a student who has made my day. 
     I hope you enjoy it here is also a video of a waterfall card in action


    Heres a list of the supplies you will need for this card. 
  • Neutral-colored cardstock
  • Colored cardstock or designer paper
  • Assorted stamps,inks or stickers
  • Paper Trimmer with a scoring blade (or a ruler and a stylus for making scored lines.)
  • Ribbon or cord (for the pull tab) ***Optional **** Mine dont have this
  • Adhesive
  • Scissors

  • Go here for instructions
    http://www.youtube.com/watch?v=PC2Gv_sQsHU&feature=plcp

    Have fun!  I would love to know if you have tried this card or not

    See ya in a bit,

    Melissa


    Friday, October 5, 2012

    The Mailbox and World Card Making Day


         October 6th is World Card Making Day, I know right.  There is a day for everything.  But hey at least this one is fun its not like Pop goes the weasel day or February 3  Cordova Ice Worm Day?, whatever that is.  For a list of more humorous days to give you and the kids a chuckle follow this link http://all-funny.info/real-list-of-national-days#sthash.SGagfOP5.dpbs.  It also might be a fun way to make a card for a friend or coworker for no reason at all other than just to say hi did you know its Cordova Ice Worm Day how are you celebrating? If you want to post your cards on the world card making day site or join others who are celebrating this day check here http://www.worldcardmakingday.com/index.html.  I should mention also that there is a chance to win a prize pack for posting a card you have made. I will be posting tutorials on here for a few new card folds for you to add to your repertoire on saturday, yes tomorrow.


         On to the box for Operation Christmas Card.  A few of you have been wondering what the dimensions are for the box, I am sorry to say that I do not have the dimensions but if you really need them I will measure for you.  I used a long rectangular box from shipping at the store and cut the end off for the arch.  I used camo duct tape for the taping and edges where I covered each side with brown paper from framing.  After the shape was made I cut a hole for the "drawer" for the cards to be dropped in.  The drawer was the hardest part and I should say dont be scared it really isnt that hard.  I just had to visualize how it was going to work.  My brain works in pictures if I dont see it, it's not real LOL!  You can tell from the pics its kind of a triangle with a front back and two sides that are kind of arched quarters of circles.  I just eyeballed everything I cut as I kinda held the cardboard up to opening for sizing.  The keeping the drawer in the hole puzzled me and I made it harder than it had to be.  I was gonna use string and a pulley system and then I thought I wonder what would happen if I just taped it to the front of the box?  What do you know I tried it and it makes a perfect hinge and opens and closes just like a mailbox.  Lesson learned here TRY IT its just tape and paper dont be afraid.....  If you have anymore questions just ask.  See ya tomorrow!


    THE BOX                                                      THE BACK DOOR lid open


    BACK DOOR lid folded up under flap


    THE DRAWER
    Keep Scrapping!
    Melissa
     

    Monday, October 1, 2012

    Cricut Tidbits and Links

    Hey everyone,

    I have not finished the mailbox as I have been sick with bronchitis, a double ear infection and sinus infection, yuck!  Anyways I wanted to type up a few links on here for those who have been interested.  After doing a few demos this weekend of the new cricut E2 and the old Expression there were alot of questions about both machines.  I go into more detail in my class with a million tips with markers, gel pens, hinge  cutting methods, what all those little pictures are on a E2 and much more.  For now I had a few customers that wanted more information on a few things and here are the anwsers to those.

    1.  Does Cricut still sell the Imagine cartridges?

    Yes they have some for sale on the cricut.com website.


    2.  How much are the mats and can you reuse them?
         The mats depending on the size and quantity vary anywhere from 10-20$.  Michael's does not let you use your 40% off coupon on them as they are cricut product (SAD).  There are websites and tutorials on resticking your mats and making them new again.  I have done this with mine and used them till they crack in half.  There is a rumor I saw on a thread on another site I just joined that there are veggie cutting mats at the dollar store that people are using.  I will test this and let you know this could be amazing!


    3.  What are the differences in all the machines.
        This website joyslife.com I will add to my sidebar.  It list all the advantages and disadvantages of all the cricut machines and the abilities of all the machines.  If you are interested in a comprehensive review of all the non Cricut cutting Machines on the market look at Under A Cherry Tree this site is also added to my sidebar.  She gives a very honest look at all the other cutters and thier abilities.


    4. Are the cartridges interchangeable from machine to machine?
    For the anwser to that question look here for a more comprehensive  link ://joyslife.com/cricut-personal-create-expression-compared.  Basically they are all interchangeable except for the Imagine carts cannot be used on other machines.


    5.  Do I have to connect my cricut to a computer?
        No but you can and the possibilites are increased when you do.  If you just want to cut simple lettering and some shapes and dont want the headache of learning a new program then dont bother.  On the other hand it is a easy learning curve to learn Cricuts Craft Room and they have freebies once in a while.  If you have the cricut mini this will be a must as it is the only way to cut and see what you are cutting as there is no screen or gel overlays on this machine.


    I hope this helps if you have any other questions about any of the other cutting machines or the cricut, please ask.  If you are interested in taking a cricut E2 class or an expression class look under my PaperEd schedule at the top of my blog to check out the next class time.


    Get scrapping,
    Melissa


    Monday, September 24, 2012

    Old drawer turned wall art


           Today I am bringing you one of my favorite projects from around my house.  Last year I went to the River Hills sales with the hubby and the kids.  One of our favorite sale haunts of the year.  There I found two old wooden drawers that looked like old post office drawers possibly.  My Husband looked at me like I was of course crazy.  They were 5$ each and so of course I grabbed both because I was envisioning a seven gypsies type of wooden scrapbook wall hanging.  You know the 12x12 ones they sell at Archivers for about 20-30 $?    Well of course I love the idea of them and the off the page scrapbook album but I love vintage even more.  So I brought them home dusted them off and picked up my paper and a few pictures and went to town.  Now there was only one paper line that I know of and love that would do for this vintage project than one of my favorites October Afternoon.  I used their Weathervane line for this.  As you can see it was a fall themed line that contains little houses, cars,colorful trees and that cozy feeling of fall.  I had a few of my favorite pictures to add from my sons senior pictures that we took in the fall at Minnehaha Falls and some from winter of the family trying on goofy hats at Macy's one day.  I added some popups behind some of the trees and cars and houses as well as Weathervane rub-ons applying them before putting them in the square. 

         So the best part of this post is this, I am having my first ever give away!  Yes it will be October Afternoon product!  See below for the picture of what I am giving away.  Plenty of paper, tin pins, chip n stick, stickers a little bit of this line and a little bit of that line.  The details are this, the giveaway will be open for two weeks anyone who leaves a comment below will be entered in the drawing.  You can leave a comment or enter daily.  Also anyone who sends a friend my way who leaves a comment telling me so and so sent them will receive another entry as well as the friend. 

        Feel free to link to this on your page or blog.  Good luck and I hope you enjoyed the new project.  Later this week I hope to share the mailbox I am making for OCC (Operation Christmas Card). Till then have a great week but most of all keep scrapping!


    Melissa


    The box
    The squares


    AND.....
     
    Last but not least.....
     
    A GIVEAWAY..... 


    **DONT FORGET TO COMMENT**

    Hmmm do I see Rocket Age,Cherry Hill, Ducks in a row, Thrift Shop, 9to5,Boarding Pass, SeaSide ????????


    Friday, September 21, 2012

    Scratch off Jokes and Confetti card invitations

    So am I safe to say that I am not alone on my Pinterest addiction?  From the quirky quote cards with the old fashion people on them too the outfits that fit mostly size 2 people. There are a ton of newly found recipes that I love, some I cooked and couldn't even attempt to eat it looked so awful but most were GREAT!  The paper arts things I have found are awesome which include the two new things I have created for my daughters invitations and classroom treats for school this year. 

    The first one is the clear see through card that I pinned a while back.  The pin referred me to this website http://pebblesinc.blogspot.fr/  scroll down to middle right side of the page and find the search key.  Type in confetti card and it will take you to a few posts that have links to confetti cards.  The card is the second link titled Dear Pebbles.  I not only loved this card, I love everything about her blog.  From the scrapbook pages she designs, to the tutorials,  It is all so fresh and new and I love the reusable embellishment packaging on the front page of the blog.  You wont be disappointed in visiting this site!!

    Second the joke scratch offs were another pinterest idea and you can find the website for this idea here at ArtMind  http://artmind-etcetera.blogspot.com/2009/05/how-to-make-scratch-off-lottery-tickets.html.  The link takes you directly to the page that has the scratch off tutorial and recipe.  It is super simple and easy.  I simply typed up some quick jokes and riddles in word printed them on cardstock and painted the metallic silver paint over the contact paper that I put over the answer.  Once dry I trimmed adhered to a fun paper for backing.  I put two jokes in a baggie with three rolls of smarties and a penny for scratching off.  The kids loved them and the jokes are still being told to friends and teachers.  I have to admit I included a few that made them think about math or spelling, I couldn't resist the learning opportunity especially when it came to a fun way to do it.

    As for the details of the invitation I bought the clear overhead sheets at Office Max about 50 sheets for 15$ about the same price for cardstock.  I cut them square so I got one card out of two sheets, you can make them smaller.  Next I sewed them on my sewing machine with white thread on three sides and filled with colored confetti circles that I cut on my cricut at 3/4 inch. After sewing the top shut, I stamped the little girl holding the balloons onto off white cardstock.  The stamp is from October Afternoons Sidewalks Collection. Next I colored the image with Copic Markers and trimmed around the edges.  I wanted most of the card to remain clear but needed to put the invitation details on it also so after trimming the image I layed it on another piece of cardstock and cut a duplicate piece of blank off white cardstock that matched the shape and size of my stamped piece.  I then could line both pieces up on the front and the back of the card and it still remain see through.  I hand wrote the details on the back of the card.

    I hope this gives you some inspiration and many thanks to those who are pinning and allowing all the creativity in our lives to go forth.

    Keep Scrapping,
    Melissa


    Wednesday, September 19, 2012

    Stamping Gear


       Today I am bringing you a fantastic new fun toy that I have had the pleasure of demoing at Michael's this past weekend.  Now that I have my hands on the new Stamping Gear set from INKADINKADOO I know exaclty what will be on my christmas list this year.   As you can see from the picture below the starter set comes with the glass block for the stamps to adhere to, a design stamp set of four doodles, a ring with notches, and a nob with notches.  You use the ring and the knob to stamp in a perfect circle every time.  Remember when you were a kid and you LOVED your spirograph?  Right? I know, me too!  I could never get enough of it.  Well this is like that but a more modern easier to use one with stamps and ink.  Here http://www.youtube.com/watch?v=6goM-oTb9_Iis a  link to the INKADINKADOO video on you tube of the demos from CHA 2012 Summer.  In the picture below I  have  posted some quicky card tops that I made while playing with it for the first time last night at home.
     After my childrens birthdays are over this week I will take the time to put them together and actually design something but in the mean time I was so excited about the possibilities that I wanted to share them with you.  For now go watch the video and come back and see me at the end of the week for the final designs.  I will also be posting soon all the invites and party favors for my daughters birthday party and treats for school that will include a fun new tutorial. 

    Also If you click the tab at the top of my page that says PaperEd schedule there will be  a list of class times that I will be teaching the stamping gear class.  So dont want to spend the money on one your self?  Want to test drive it and see if you like it or not.  Come take a class.  There are times every month through the rest of  2012.  Any questions give me a shout!  And as always keep scrapping.

    Melissa